DIY 3D Miniature House Puzzle Kit: Desk-Ready Build
DIY 3D Puzzle Miniature House Kit: Build a Display-Worthy Mini Scene
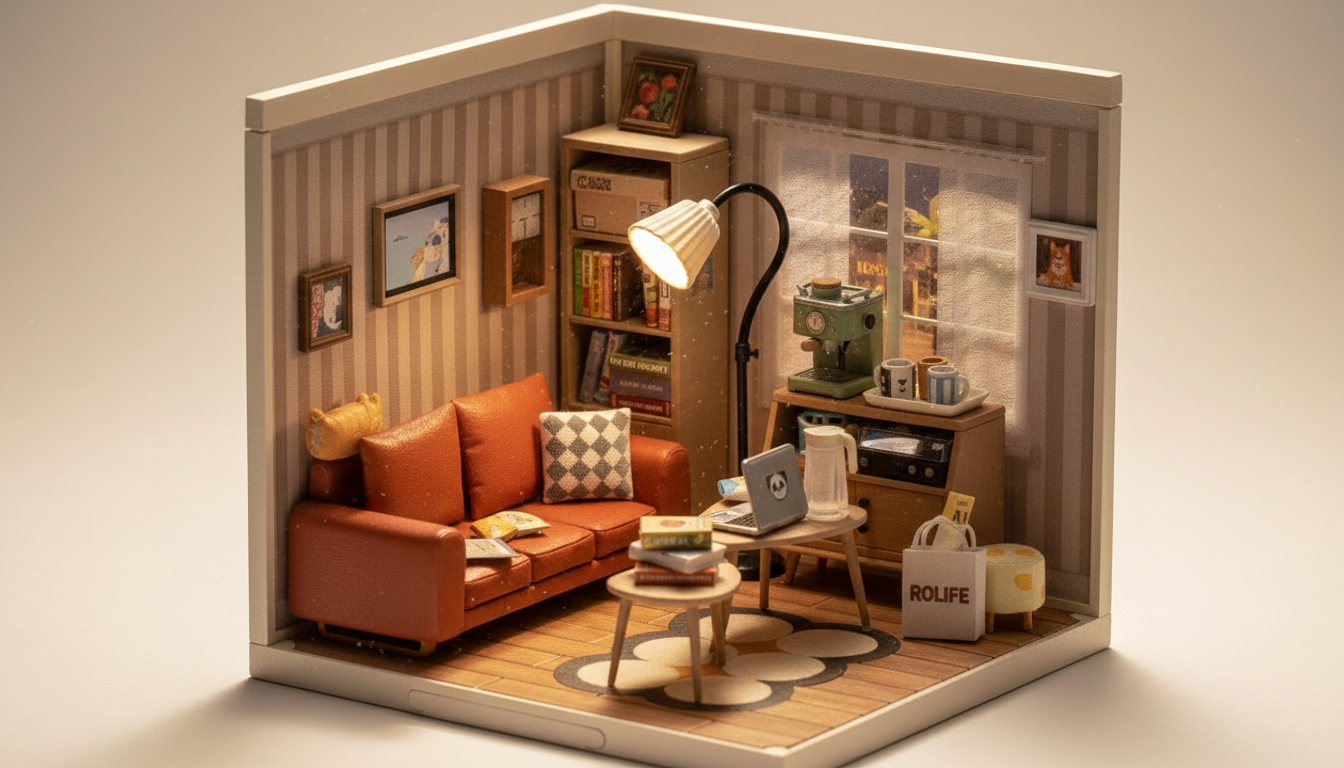
A miniature house kit that assembles like a 3D puzzle blends the best parts of building and crafting: clear, step-by-step construction, satisfying progress, and a finished scene that looks “store-bought” when it’s done. Instead of freehand measuring and cutting, you’re fitting pre-cut parts together, then upgrading the look with tiny décor details. The result is a relaxing project that rewards patience—without turning into a frustrating craft marathon.
What This Kit Is (and Why It’s So Addictive)
A DIY 3D puzzle miniature house kit is a buildable miniature structure made from pre-cut parts that assemble in a guided sequence—similar to a 3D puzzle, but with more visual detail and a stronger “mini world” payoff. Each session tends to follow a satisfying rhythm: sort parts, dry-fit, then commit with glue.
The finished model is designed to look great on a desk, bookshelf, or inside a display case. Because the tasks are small and repeatable, it’s easy to slow down and focus—making it a solid choice for anyone who likes calm, hands-on hobbies that still feel productive.
If you want a shelf-ready project to start right away, take a look at the DIY 3D Puzzle Miniature House Kit.
What’s Typically Included in the Box
Most miniature house puzzle kits include a mix of structural pieces and tiny decorative elements that create the interior scene. Exact contents vary by theme, but the overall experience is consistent: build the shell, then bring the space to life.
- Pre-cut building components (often wood or composite board), plus decorative elements for the interior scene.
- Step-by-step instructions that map out sub-assemblies (walls, floors, furniture, roof) before final joining.
- Adhesives may be included in some kits; if not, standard craft glue works well for most materials.
- Small detail pieces: windows, frames, signs, plants, or tiny props depending on the design theme.
- Packaging that can double as a parts tray—keeping everything organized helps prevent lost pieces.
Because many kits include small parts, review basic toy and hobby safety guidance and keep pieces away from young children and pets. The U.S. Consumer Product Safety Commission has general safety information worth skimming for households with kids (CPSC toy safety guides), and ASTM outlines widely used toy safety standards (ASTM F963 overview).
Skill Level, Age Fit, and Time Expectations
These kits are best for builders who enjoy careful assembly and fine details. Beginners can absolutely succeed, but the best results come from slower pacing and clean habits (dry-fitting and minimal glue). Small parts can be a choking hazard, so adult supervision matters for younger hobbyists.
Instead of trying to finish in one long day, plan multiple shorter sessions. Glue cures cleaner, parts stay aligned, and you’re less likely to rush a step that’s hard to undo. A tidy, well-lit workspace matters more than speed—an inexpensive desk lamp can make tiny alignment points much easier to see.
Quick Planning Guide for a Smooth Build
| Build aspect | What to expect | Helpful tip |
|---|---|---|
| Time commitment | Multiple sessions across a few days | Set a 30–60 minute timer and stop at a clean checkpoint |
| Dexterity | Frequent handling of small parts | Use tweezers for tiny pieces and a tray to prevent roll-offs |
| Tools | Light crafting tools are enough | Keep a hobby knife, small scissors, and sandpaper nearby |
| Finishing | Optional but makes it look premium | Wipe excess glue immediately and touch up edges if needed |
Tools and Supplies That Make It Easier
You don’t need a full workshop. A few small tools will noticeably improve accuracy and reduce glue mess—especially when placing décor or squaring walls.
- Tweezers: essential for placing small décor pieces accurately without smearing glue.
- Hobby knife and small scissors: useful for trimming tabs, removing fuzz, and cleaning tiny edges.
- Fine-grit sandpaper or a sanding stick: helps parts seat properly and improves fit before gluing.
- White craft glue or clear-drying tacky glue: offers working time for alignment and dries neatly.
- Clips or small clamps: hold walls and roof lines steady while glue sets (clothespins work in a pinch).
Step-by-Step Assembly Workflow (No Guesswork)
A clean workflow makes the whole project feel straightforward. The goal is to avoid “glue-first thinking” and replace it with test-fitting and controlled assembly.
If you enjoy this build style but want a different “mechanical” vibe for your next project, the 3D Wooden Racing Car Puzzle Kit is a fun companion piece for a themed shelf of 3D builds.
Finishing Touches That Upgrade the Final Look
Gifting and Display Ideas
Common Issues and Simple Fixes
FAQ
Is a DIY 3D miniature house kit suitable for beginners?
Yes, if the builder is comfortable working with small parts and follows a slow, step-by-step approach. Dry-fit first, glue sparingly, and build in short sessions to keep everything clean and aligned.
What tools are actually necessary to assemble it well?
Tweezers, a hobby knife or small scissors, fine sandpaper, and clear-drying craft glue cover most needs. Clips or small clamps also help keep walls straight while glue sets.
How long does it take to complete a miniature house puzzle kit?
Usually it’s best done in several sessions rather than one sitting. Total time depends on the kit’s detail level and drying time, but planning for a few days of shorter builds helps maintain accuracy.


Leave a comment